Documentation Index
Fetch the complete documentation index at: https://cantonfoundation-issue-409-bottom-header-height.mintlify.app/llms.txt
Use this file to discover all available pages before exploring further.
This section describes deploying a Super Validator (SV) node in kubernetes using Helm charts. The Helm charts deploy a complete node and connect it to a target cluster.
Requirements
Generating an SV identity
SV operators are identified by a human-readable name and an EC public key. This identification is stable across deployments of the Global Synchronizer. You are, for example, expected to reuse your SV name and public key between (test-)network resets.
Use the following shell commands to generate a keypair in the format expected by the SV node software:
# Generate the keypair
openssl ecparam -name prime256v1 -genkey -noout -out sv-keys.pem

# Encode the keys
public_key_base64=$(openssl ec -in sv-keys.pem -pubout -outform DER 2>/dev/null | base64 | tr -d "\n")
private_key_base64=$(openssl pkcs8 -topk8 -nocrypt -in sv-keys.pem -outform DER 2>/dev/null | base64 | tr -d "\n")

# Output the keys
echo "public-key = \"$public_key_base64\""
echo "private-key = \"$private_key_base64\""

# Clean up
rm sv-keys.pem
public-key = "MFkwEwYHKoZIzj0CAQYIKoZIzj0DAQcDQgAE1eb+JkH2QFRCZedO/P5cq5d2+yfdwP+jE+9w3cT6BqfHxCd/PyA0mmWMePovShmf97HlUajFuN05kZgxvjcPQw=="
private-key = "MEECAQAwEwYHKoZIzj0CAQYIKoZIzj0DAQcEJzAlAgEBBCBsFuFa7Eumkdg4dcf/vxIXgAje2ULVz+qTKP3s/tHqKw=="
public-key and your desired SV name need to be approved by a threshold of currently active SVs in order for you to be able to join the network as an SV. For DevNet and the current early version of TestNet, send the public-key and your desired SV name to your point of contact at Digital Asset (DA) and wait for confirmation that your SV identity has been approved and configured at existing SV nodes.
adjust wording above to the fact the MainNet is live
Preparing a Cluster for Installation
Create the application namespace within Kubernetes.
Configuring Authentication
For security, the various components that comprise your SV node need to be able to authenticate themselves to each other, as well as be able to authenticate external UI and API users. We use JWT access tokens for authentication and expect these tokens to be issued by an (external) OpenID Connect (OIDC) provider. You must:
- Set up an OIDC provider in such a way that both backends and web UI users are able to obtain JWTs in a supported form.
- Configure your backends to use that OIDC provider.
OIDC Provider Requirements
This section provides pointers for setting up an OIDC provider for use with your SV node. Feel free to skip directly to helm-sv-auth0 if you plan to use Auth0 for your SV node’s authentication needs. That said, we encourage you to move to an OIDC provider different from Auth0 for the long-term production deployment of your SV, to avoid security risks resulting from a majority of SVs depending on the same authentication provider (which could expose the whole network to potential security problems at this provider).
Your OIDC provider must be reachable1 at a well known (HTTPS) URL. In the following, we will refer to this URL as OIDC_AUTHORITY_URL. Both your SV node and any users that wish to authenticate to a web UI connected to your SV node must be able to reach the OIDC_AUTHORITY_URL. We require your OIDC provider to provide a discovery document at OIDC_AUTHORITY_URL/.well-known/openid-configuration. We furthermore require that your OIDC provider exposes a JWK Set document. In this documentation, we assume that this document is available at OIDC_AUTHORITY_URL/.well-known/jwks.json.
For machine-to-machine (SV node component to SV node component) authentication, your OIDC provider must support the OAuth 2.0 Client Credentials Grant flow. This means that you must be able to configure (CLIENT_ID, CLIENT_SECRET) pairs for all SV node components that need to authenticate to others. Currently, these are the validator app backend and the SV app backend - both need to authenticate to the SV node’s Canton participant. The sub field of JWTs issued through this flow must match the user ID configured as ledger-api-user in helm-sv-auth-secrets-config. In this documentation, we assume that the sub field of these JWTs is formed as CLIENT_ID@clients. If this is not true for your OIDC provider, pay extra attention when configuring ledger-api-user values below.
For user-facing authentication - allowing users to access the various web UIs hosted on your SV node, your OIDC provider must support the OAuth 2.0 Authorization Code Grant flow and allow you to obtain client identifiers for the web UIs your SV node will be hosting. Currently, these are the SV web UI, the Wallet web UI and the CNS web UI. You might be required to whitelist a range of URLs on your OIDC provider, such as “Allowed Callback URLs”, “Allowed Logout URLs”, “Allowed Web Origins”, and “Allowed Origins (CORS)”. If you are using the ingress configuration of this runbook, the correct URLs to configure here are https://sv.sv.YOUR_HOSTNAME (for the SV web UI) , https://wallet.sv.YOUR_HOSTNAME (for the Wallet web UI) and https://cns.sv.YOUR_HOSTNAME (for the CNS web UI). An identifier that is unique to the user must be set via the sub field of the issued JWT. On some occasions, this identifier will be used as a user name for that user on your SV node’s Canton participant. In helm-sv-install, you will be required to configure a user identifier as the validatorWalletUser -make sure that whatever you configure there matches the contents of the sub field of JWTs issued for that user.
All JWTs issued for use with your SV node:
- must be signed using the RS256 signing algorithm.
In the future, your OIDC provider might additionally be required to issue JWTs with a scope explicitly set to daml_ledger_api (when requested to do so as part of the OAuth 2.0 authorization code flow).
Summing up, your OIDC provider setup must provide you with the following configuration values:
| Name | Value |
|---|
| OIDC_AUTHORITY_URL | The URL of your OIDC provider for obtaining the openid-configuration and jwks.json. |
| VALIDATOR_CLIENT_ID | The client id of your OIDC provider for the validator app backend |
| VALIDATOR_CLIENT_SECRET | The client secret of your OIDC provider for the validator app backend |
| SV_CLIENT_ID | The client id of your OIDC provider for the SV app backend |
| SV_CLIENT_SECRET | The client secret of your OIDC provider for the SV app backend |
| WALLET_UI_CLIENT_ID | The client id of your OIDC provider for the wallet UI. |
| SV_UI_CLIENT_ID | The client id of your OIDC provider for the SV UI. |
| CNS_UI_CLIENT_ID | The client id of your OIDC provider for the CNS UI. |
Name column, in helm-sv-auth-secrets-config and helm-sv-install.
When first starting out, it is suggested to configure all three JWT token audiences below to the same value: https://canton.network.global.
Once you can confirm that your setup is working correctly using this (simple) default, we strongly recommend that you configure dedicated audience values that match your deployment and URLs. This will help you to avoid potential security issues that might arise from using the same audience for all components.
You can configure audiences of your choice for the participant ledger API, the validator backend API, and the SV backend API. We will refer to these using the following configuration values:
| Name | Value |
|---|
| OIDC_AUTHORITY_LEDGER_API_AUDIENCE | The audience for the participant ledger API. e.g. https://ledger_api.example.com |
| OIDC_AUTHORITY_VALIDATOR_AUDIENCE | The audience for the validator backend API. e.g. https://validator.example.com/api |
| OIDC_AUTHORITY_SV_AUDIENCE | The audience for the SV backend API. e.g. https://sv.example.com/api |
| Name | Value |
|---|
| OIDC_AUTHORITY_LEDGER_API_SCOPE | The scope for the participant ledger API. Optional |
helm-sv-auth0 as well, to check for functionality or configuration details that your OIDC provider setup might be missing.
Configuring an Auth0 Tenant
To configure Auth0 as your SV’s OIDC provider, perform the following:
-
Create an Auth0 tenant for your SV
-
Create an Auth0 API that controls access to the ledger API:
- Navigate to Applications > APIs and click “Create API”. Set name to
Daml Ledger API, set identifier to https://canton.network.global. Alternatively, if you would like to configure your own audience, you can set the identifier here. e.g. https://ledger_api.example.com.
- Under the Permissions tab in the new API, add a permission with scope
daml_ledger_api, and a description of your choice.
- On the Settings tab, scroll down to “Access Settings” and enable “Allow Offline Access”, for automatic token refreshing.
-
Create an Auth0 Application for the validator backend:
- In Auth0, navigate to Applications -> Applications, and click the “Create Application” button.
- Name it
Validator app backend, choose “Machine to Machine Applications”, and click Create.
- Choose the
Daml Ledger API API you created in step 2 in the “Authorize Machine to Machine Application” dialog and click Authorize.
-
Create an Auth0 Application for the SV backend. Repeat all steps described in step 3, using
SV app backend as the name of your application.
-
Create an Auth0 Application for the SV web UI:
- In Auth0, navigate to Applications -> Applications, and click the “Create Application” button.
- Choose “Single Page Web Applications”, call it
SV web UI, and click Create.
- Determine the URL for your validator’s SV UI. If you’re using the ingress configuration of this runbook, that would be
https://sv.sv.YOUR_HOSTNAME.
- In the Auth0 application settings, add the SV URL to the following:
- “Allowed Callback URLs”
- “Allowed Logout URLs”
- “Allowed Web Origins”
- “Allowed Origins (CORS)”
- Save your application settings.
-
Create an Auth0 Application for the wallet web UI. Repeat all steps described in step 5, with following modifications:
- In step b, use
Wallet web UI as the name of your application.
- In steps c and d, use the URL for your SV’s wallet UI. If you’re using the ingress configuration of this runbook, that would be
https://wallet.sv.YOUR_HOSTNAME.
-
Create an Auth0 Application for the CNS web UI. Repeat all steps described in step 5, with following modifications:
- In step b, use
CNS web UI as the name of your application.
- In steps c and d, use the URL for your SV’s CNS UI. If you’re using the ingress configuration of this runbook, that would be
https://cns.sv.YOUR_HOSTNAME.
-
(Optional) Similarly to the ledger API above, the default audience is set to
https://canton.network.global.
If you want to configure a different audience to your APIs, you can do so by creating new Auth0 APIs with an identifier set to the audience of your choice. For example,
- Navigate to Applications > APIs and click “Create API”. Set name to
SV App API, set identifier for the SV backend app API e.g. https://sv.example.com/api.
- Create another API by setting name to
Validator App API, set identifier for the Validator backend app e.g. https://validator.example.com/api.
Please refer to Auth0’s own documentation on user management for pointers on how to set up end-user accounts for the two web UI applications you created. Note that you will need to create at least one such user account for completing the steps in helm-sv-install - for being able to log in as your SV node’s administrator. You will be asked to obtain the user identifier for this user account. It can be found in the Auth0 interface under User Management -> Users -> your user’s name -> user_id (a field right under the user’s name at the top).
We will use the environment variables listed in the table below to refer to aspects of your Auth0 configuration:
| Name | Value |
|---|
| OIDC_AUTHORITY_URL | https://AUTH0_TENANT_NAME.us.auth0.com |
| OIDC_AUTHORITY_LEDGER_API_AUDIENCE | The optional audience of your choice for Ledger API. e.g. https://ledger_api.example.com |
| VALIDATOR_CLIENT_ID | The client id of the Auth0 app for the validator app backend |
| VALIDATOR_CLIENT_SECRET | The client secret of the Auth0 app for the validator app backend |
| SV_CLIENT_ID | The client id of the Auth0 app for the SV app backend |
| SV_CLIENT_SECRET | The client secret of the Auth0 app for the SV app backend |
| WALLET_UI_CLIENT_ID | The client id of the Auth0 app for the wallet UI. |
| SV_UI_CLIENT_ID | The client id of the Auth0 app for the SV UI. |
| CNS_UI_CLIENT_ID | The client id of the Auth0 app for the CNS UI. |
AUTH0_TENANT_NAME is the name of your Auth0 tenant as shown at the top left of your Auth0 project. You can obtain the client ID and secret of each Auth0 app from the settings pages of that app.
Configuring Authentication on your SV Node
We are now going to configure your SV node software based on the OIDC provider configuration values your exported to environment variables at the end of either helm-sv-auth-requirements or helm-sv-auth0. (Note that some authentication-related configuration steps are also included in helm-sv-install.)
The following kubernetes secret will instruct the participant to create a service user for your SV app (omit the scope if it is not needed in your setup).
    kubectl create --namespace sv secret generic splice-app-sv-ledger-api-auth \
        "--from-literal=ledger-api-user=${SV_CLIENT_ID}@clients" \
        "--from-literal=url=${OIDC_AUTHORITY_URL}/.well-known/openid-configuration" \
        "--from-literal=client-id=${SV_CLIENT_ID}" \
        "--from-literal=client-secret=${SV_CLIENT_SECRET}" \
        "--from-literal=audience=${OIDC_AUTHORITY_LEDGER_API_AUDIENCE}"
        "--from-literal=scope=${OIDC_AUTHORITY_LEDGER_API_SCOPE}"
    kubectl create --namespace sv secret generic splice-app-validator-ledger-api-auth \
        "--from-literal=ledger-api-user=${VALIDATOR_CLIENT_ID}@clients" \
        "--from-literal=url=${OIDC_AUTHORITY_URL}/.well-known/openid-configuration" \
        "--from-literal=client-id=${VALIDATOR_CLIENT_ID}" \
        "--from-literal=client-secret=${VALIDATOR_CLIENT_SECRET}" \
        "--from-literal=audience=${OIDC_AUTHORITY_LEDGER_API_AUDIENCE}" \
        "--from-literal=scope=${OIDC_AUTHORITY_LEDGER_API_SCOPE}"
    kubectl create --namespace sv secret generic splice-app-wallet-ui-auth \
        "--from-literal=url=${OIDC_AUTHORITY_URL}" \
        "--from-literal=client-id=${WALLET_UI_CLIENT_ID}"

    kubectl create --namespace sv secret generic splice-app-sv-ui-auth \
        "--from-literal=url=${OIDC_AUTHORITY_URL}" \
        "--from-literal=client-id=${SV_UI_CLIENT_ID}"

    kubectl create --namespace sv secret generic splice-app-cns-ui-auth \
        "--from-literal=url=${OIDC_AUTHORITY_URL}" \
        "--from-literal=client-id=${CNS_UI_CLIENT_ID}"
Configuring your CometBFT node
Every SV node also deploys a CometBFT node. This node must be configured to join the existing Global Synchronizer BFT chain. To do that, you first must generate the keys that will identify the node.
Generating your CometBFT node keys
Configuring your CometBFT node keys
The CometBFT node is configured with a secret, based on the output from Generating the CometBFT node identity The secret is created as follows, with the node_key.json and priv_validator_key.json files representing the files generated as part of the node identity:
    kubectl create --namespace sv secret generic cometbft-keys \
        "--from-file=node_key.json=node_key.json" \
        "--from-file=priv_validator_key.json=priv_validator_key.json"
Configuring CometBFT state sync
CometBFT state sync introduces a dependency on the sponsoring node for fetching the state snapshot on startup and therefore a single point of failure. It should only be enabled when joining a new node to a chain that has already been running for a while. In all other cases including for a new node after it has completed initialization and after network resets, state sync should be disabled.
rpc_servers - The list of CometBFT RPC servers to connect to in order to fetch snapshotstrust_height - Height at which you should trust the chaintrust_hash - Hash corresponding to the trusted height
A CometBFT node installed using our helm charts (see helm-sv-install) with the default values set in splice-node/examples/sv-helm/cometbft-values.yaml automatically uses state sync for bootstrapping if:
- it has not been explicitly disabled by setting
stateSync.enable to false
- the block chain is mature enough for at least 1 state snapshot to have been taken i.e. the height of the latest block is greater than or equal to the configured interval between snapshots
The snapshots are fetched from your onboarding sponsor which exposes its CometBFT RPC API at https://sv.sv-X.TARGET_HOSTNAME:443/cometbft-rpc/. This can be changed by setting stateSync.rpcServers accordingly. The trust_height and trust_hash are computed dynamically via an initialization script and setting them explicitly should not be required and is not currently supported.
Configuring BFT Sequencer Connections
By default, SV participants use BFT sequencer connections to interact with the Global Synchronizer, i.e., they maintain connections to a random subset of all sequencers (most of which typically operated by other SVs) and perform reads and writes in the same BFT manner used by regular validators. In principle, this mode of operation is more robust than using a single connection to the sequencer operated by the SV itself. However, bugs in the BFT sequencer connection logic or severe instability of other SVs’s sequencers can make it prudent to temporarily switch back to using a single sequencer connection.
To do so, SV operators must perform the following steps.
Step 1. In sv-validator-values.yaml, add the following synchronizer config.
synchronizer:
  connectionType: "trust-single"
  url: "SEQUENCER_PUBLIC_URI" # synchronizers.current.sequencerPublicUrl from sv-values.yaml
validator-values.yaml, add the following or an equivalent config override:
    additionalEnvVars:
        - name: ADDITIONAL_CONFIG_NO_BFT_SEQUENCER_CONNECTION
          value: "canton.validator-apps.validator_backend.disable-sv-validator-bft-sequencer-connection = true"
sv-values.yaml, add the following or an equivalent config override:
    additionalEnvVars:
        - name: ADDITIONAL_CONFIG_NO_BFT_SEQUENCER_CONNECTION
          value: "canton.sv-apps.sv.bft-sequencer-connection = false"
participant.synchronizers.config("global"). In case BFT sequencer connections are disabled, this should return a single sequencer connection in an output similar to the following:
@ participant.synchronizers.config("global")
res1: Option[SynchronizerConnectionConfig] = Some(
  value = SynchronizerConnectionConfig(
    synchronizer = Synchronizer \'global\',
    sequencerConnections = SequencerConnections(
      connections = Sequencer \'DefaultSequencer\' -> GrpcSequencerConnection(sequencerAlias = Sequencer \'DefaultSequencer\', endpoints = http://global-domain-0-sequencer:5008),
      sequencer trust threshold = 1,
      submission request amplification = SubmissionRequestAmplification(factor = 1, patience = 10s)
    ),
    manualConnect = false,
    timeTracker = SynchronizerTimeTrackerConfig(minObservationDuration = 30m)
  )
)
DEBUG-level entry such as Connecting to synchronizer with config: SynchronizerConnectionConfig(...), which contains the same information.
Installing Postgres instances
The SV node requires 4 Postgres instances: one for the sequencer, one for the mediator, one for the participant, and one for the CN apps. While they can all use the same instance, we recommend splitting them up into 4 separate instances for better operational flexibility, and also for better control over backup processes.
We support both Cloud-hosted Postgres instances and Postgres instances running in the cluster.
Creating k8s Secrets for Postgres Passwords
All apps support reading the Postgres password from a Kubernetes secret. Currently, all apps use the Postgres user cnadmin. The password can be setup with the following command, assuming you set the environment variables POSTGRES_PASSWORD_XXX to secure values:
    kubectl create secret generic sequencer-pg-secret \
        --from-literal=postgresPassword=${POSTGRES_PASSWORD_SEQUENCER} \
        -n sv
    kubectl create secret generic mediator-pg-secret \
        --from-literal=postgresPassword=${POSTGRES_PASSWORD_MEDIATOR} \
        -n sv
    kubectl create secret generic participant-pg-secret \
        --from-literal=postgresPassword=${POSTGRES_PASSWORD_PARTICIPANT} \
        -n sv
    kubectl create secret generic apps-pg-secret \
        --from-literal=postgresPassword=${POSTGRES_PASSWORD_APPS} \
        -n sv
Postgres in the Cluster
Cloud-Hosted Postgres
If you wish to use cloud-hosted Postgres instances, please configure and initialize each of them as follows:
- Use Postgres version 14
- Create a database called
cantonnet (this is a dummy database that will not be filled with actual data; additional databases will be created as part of deployment and initialization)
- Create a user called
cnadmin with the password as configured in the kubernetes secrets above
Note that the default Helm values files used below assume that the Postgres instances are deployed using the Helm charts above, thus are accessible at hostname sequencer-pg, mediator-pg, etc. If you are using cloud-hosted Postgres instances, please override the hostnames under persistence.host with the IP addresses of the Postgres instances. To avoid conflicts across migration IDs, you will also need to ensure that persistence.databaseName is unique per component (participant, sequencer, mediator) and migration ID.
Installing the Software
Configuring the Helm Charts
Installing the Helm Charts
SV Network Diagram

Configuring the Cluster Ingress
Hostnames and URLs
The SV operators have decided to follow the following convention for all SV hostnames and URLs:
- For DevNet, all hostnames should be in the format
<service-name>.sv-<enumerator>.dev.global.canton.network.<companyTLD>, where:
<service-name> is the name of the service, e.g., sv, wallet, scan<enumerator> is a unique number for each SV node operated by the same organization, starting at 1, e.g. sv-1 for the first node operated by an organization.<companyTLD> is the top-level domain of the company operating the SV node, e.g. digitalasset.com for Digital Asset.
- For TestNet, all hostnames should similarly be in the format
<service-name>.sv-<enumerator>.test.global.canton.network.<companyTLD>.
- For MainNet, all hostnames should be in the format all hostnames should be in the format
<service-name>.sv-<enumerator>.global.canton.network.<companyTLD> (note that for MainNet, the name of the network, e.g. dev/test/main is ommitted from the hostname).
Note that the reference ingress charts provided below do not fully satisfy these requirements, as they ommit the enumerator part of the hostname.
Ingress Configuration
An IP whitelisting json file allowed-ip-ranges.json is maintained for each relevant network (DevNet, TestNet, MainNet) in the private SV configs repo. This file contains other clusters’ egress IPs that require access to your SV’s components. For example, it contains IPs belonging to peer super-validators and validators.
To keep the attack surface on your SV deployment and the Global Synchronizer small, please ensure that only traffic from trusted IPs -IPs from the whitelist file and any IPs that you manually verified and explicitly trust yourself -can reach your SV deployment.
https://wallet.sv.<YOUR_HOSTNAME> should be routed to service wallet-web-ui in the sv namespace.https://wallet.sv.<YOUR_HOSTNAME>/api/validator should be routed to /api/validator at port 5003 of service validator-app in the sv namespace.https://sv.sv.<YOUR_HOSTNAME> should be routed to service sv-web-ui in the sv namespace.https://sv.sv.<YOUR_HOSTNAME>/api/sv should be routed to /api/sv at port 5014 of service sv-app in the sv namespace.https://scan.sv.<YOUR_HOSTNAME> should be routed to service scan-web-ui in the sv namespace.https://scan.sv.<YOUR_HOSTNAME>/api/scan should be routed to /api/scan at port 5012 in service scan-app in the sv namespace.https://scan.sv.<YOUR_HOSTNAME>/registry should be routed to /registry at port 5012 in service scan-app in the sv namespace.global-domain-<SERIAL_ID>-cometbft.sv.<YOUR_HOSTNAME>:26<SERIAL_ID>56 should be routed to port 26656 of service global-domain-<SERIAL_ID>-cometbft-cometbft-p2p in the sv namespace using the TCP protocol. Please note that cometBFT traffic is purely TCP. TLS is not supported so SNI host routing for these traffic is not possible.https://cns.sv.<YOUR_HOSTNAME> should be routed to service ans-web-ui in the sv namespace.https://cns.sv.<YOUR_HOSTNAME>/api/validator should be routed to /api/validator at port 5003 of service validator-app in the sv namespace.https://sequencer-<SERIAL_ID>.sv.<YOUR_HOSTNAME> should be routed to port 5008 of service global-domain-<SERIAL_ID>-sequencer in the sv namespace.https://info.sv.<YOUR_HOSTNAME> should be routed to service info in the sv namespace. This endpoint should be publicly accessible without any IP restrictions.
To keep the attack surface on your SV deployment and the Global Synchronizer small, please disallow ingress connections to all other services in your SV deployment. It should be assumed that opening up any additional port or service represents a security risk that needs to be carefully evaluated on a case-by-case basis.
global-domain-sequencer so that other validators can subscribe to it.
Make sure your cluster’s ingress is correctly configured for the sequencer service and can be accessed through the provided URL. To check whether the sequencer is accessible, we can use the command below with the grpcurl tool :
grpcurl <sequencer host>:<sequencer port> grpc.health.v1.Health/Check
<sequencer host>:<sequencer port> should be sequencer-SERIAL_ID.sv.YOUR_HOSTNAME:443 Please replace YOUR_HOSTNAME with your host name and SERIAL_ID with the serial ID of the synchronizer that the sequencer is part of.
If you see the response below, it means the sequencer is up and accessible through the URL.
Requirements
In order to install the reference charts, the following must be satisfied in your cluster:
Example of Istio installation:
    helm repo add istio https://istio-release.storage.googleapis.com/charts
    helm repo update
    helm install istio-base istio/base -n istio-system --set defaults.global.istioNamespace=cluster-ingress --wait
    helm install istiod istio/istiod -n cluster-ingress --set global.istioNamespace="cluster-ingress" --set meshConfig.accessLogFile="/dev/stdout"  --wait
Installation Instructions
Configuring the Cluster Egress
Below is a complete list of destinations for outbound traffic from the Super Validator node. This list is useful for an SV that wishes to limit egress to only allow the minimum necessary outbound traffic. S will be used a shorthand for SERIAL_ID. The tables below are wide - you might need to scroll vertically to see the rightmost columns.
Connectivity to the following destinations is required throughout operation to ensure the robustness of the ordering layer and scan:
| Destination | Url | Protocol | Source pod |
|---|
| CometBft P2P | CometBft p2p IPs and ports 26<S>16, 26<S>26, 26<S>36, 26<S>46, 26<S>56 | TCP | global-domain-<S>-cometbft |
| All SV Scans | all returned from https://scan.sv-1.<TARGET_HOSTNAME>/api/scan/v0/scans | HTTPS | scan-app |
BFT fashion. It might also be required in the future to support the operation of the ordering layer (post CometBFT). To get a list of all current scan instances, you can query the /api/scan/v0/scans endpoint on any scan instances known to you. For example using the sponsor’s scan instance (and with some optional post-processing using jq):
curl https://scan.sv-1.<TARGET_HOSTNAME>/api/scan/v0/scans | jq -r '.scans.[].scans.[].publicUrl'
In addition to above destinations, the SV node must be able to reach its onboarding sponsor and all scan instances for onboarding to the network:
| Destination | Url | Protocol | Source pod |
|---|
| Sponsor SV | sv.sv-1.<TARGET_HOSTNAME>:443 | HTTPS | sv-app |
| CometBft JSON RPC | sv.sv-1.<TARGET_HOSTNAME>:443/api/sv/v0/admin/domain/cometbft/json-rpc | HTTPS | global-domain-<S>-cometbft |
| Sponsor SV Sequencer | sequencer-<S>.sv-1.<TARGET_HOSTNAME>:443 | HTTPS | participant-<S> |
| Sponsor SV Scan | scan.sv-1.<TARGET_HOSTNAME>:443 | HTTPS | validator-app |
<TARGET_HOSTNAME> and sv-1 in the above table to match the address of your SV onboarding sponsor. Note also that the address for the CometBft JSON RPC is configured in cometbft-values.yaml (under stateSync.rpcServers). Any onboarded SV can act as an SV onboarding sponsor.
In general, connectivity to the sponsor SV (outside of scan) is only required during SV onboarding. Connectivity to the sponsor SV sequencer is required also for a limited transition time after onboarding during which the newly onboarded SV sequencer is not ready for use yet (60 seconds with the current Global Synchronizer configuration).
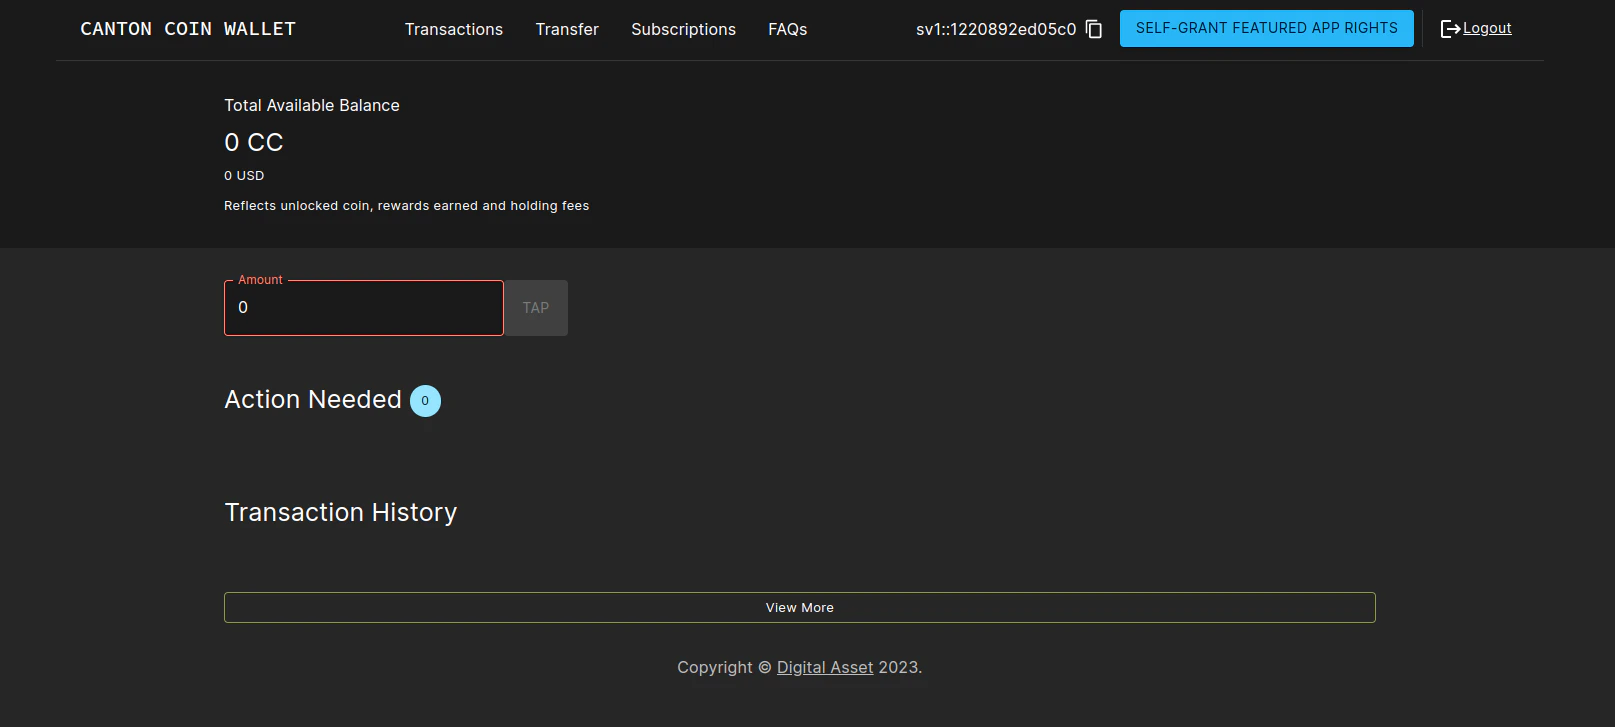
Logging into the wallet UI
After you deploy your ingress, open your browser at https://wallet.sv.YOUR_HOSTNAME and login using the credentials for the user that you configured as validatorWalletUser earlier. You will be able to see your balance increase as mining rounds advance every 2.5 minutes and you will see sv_reward_collected entries in your transaction history. Once logged in one should see the transactions page.
Logging into the CNS UI
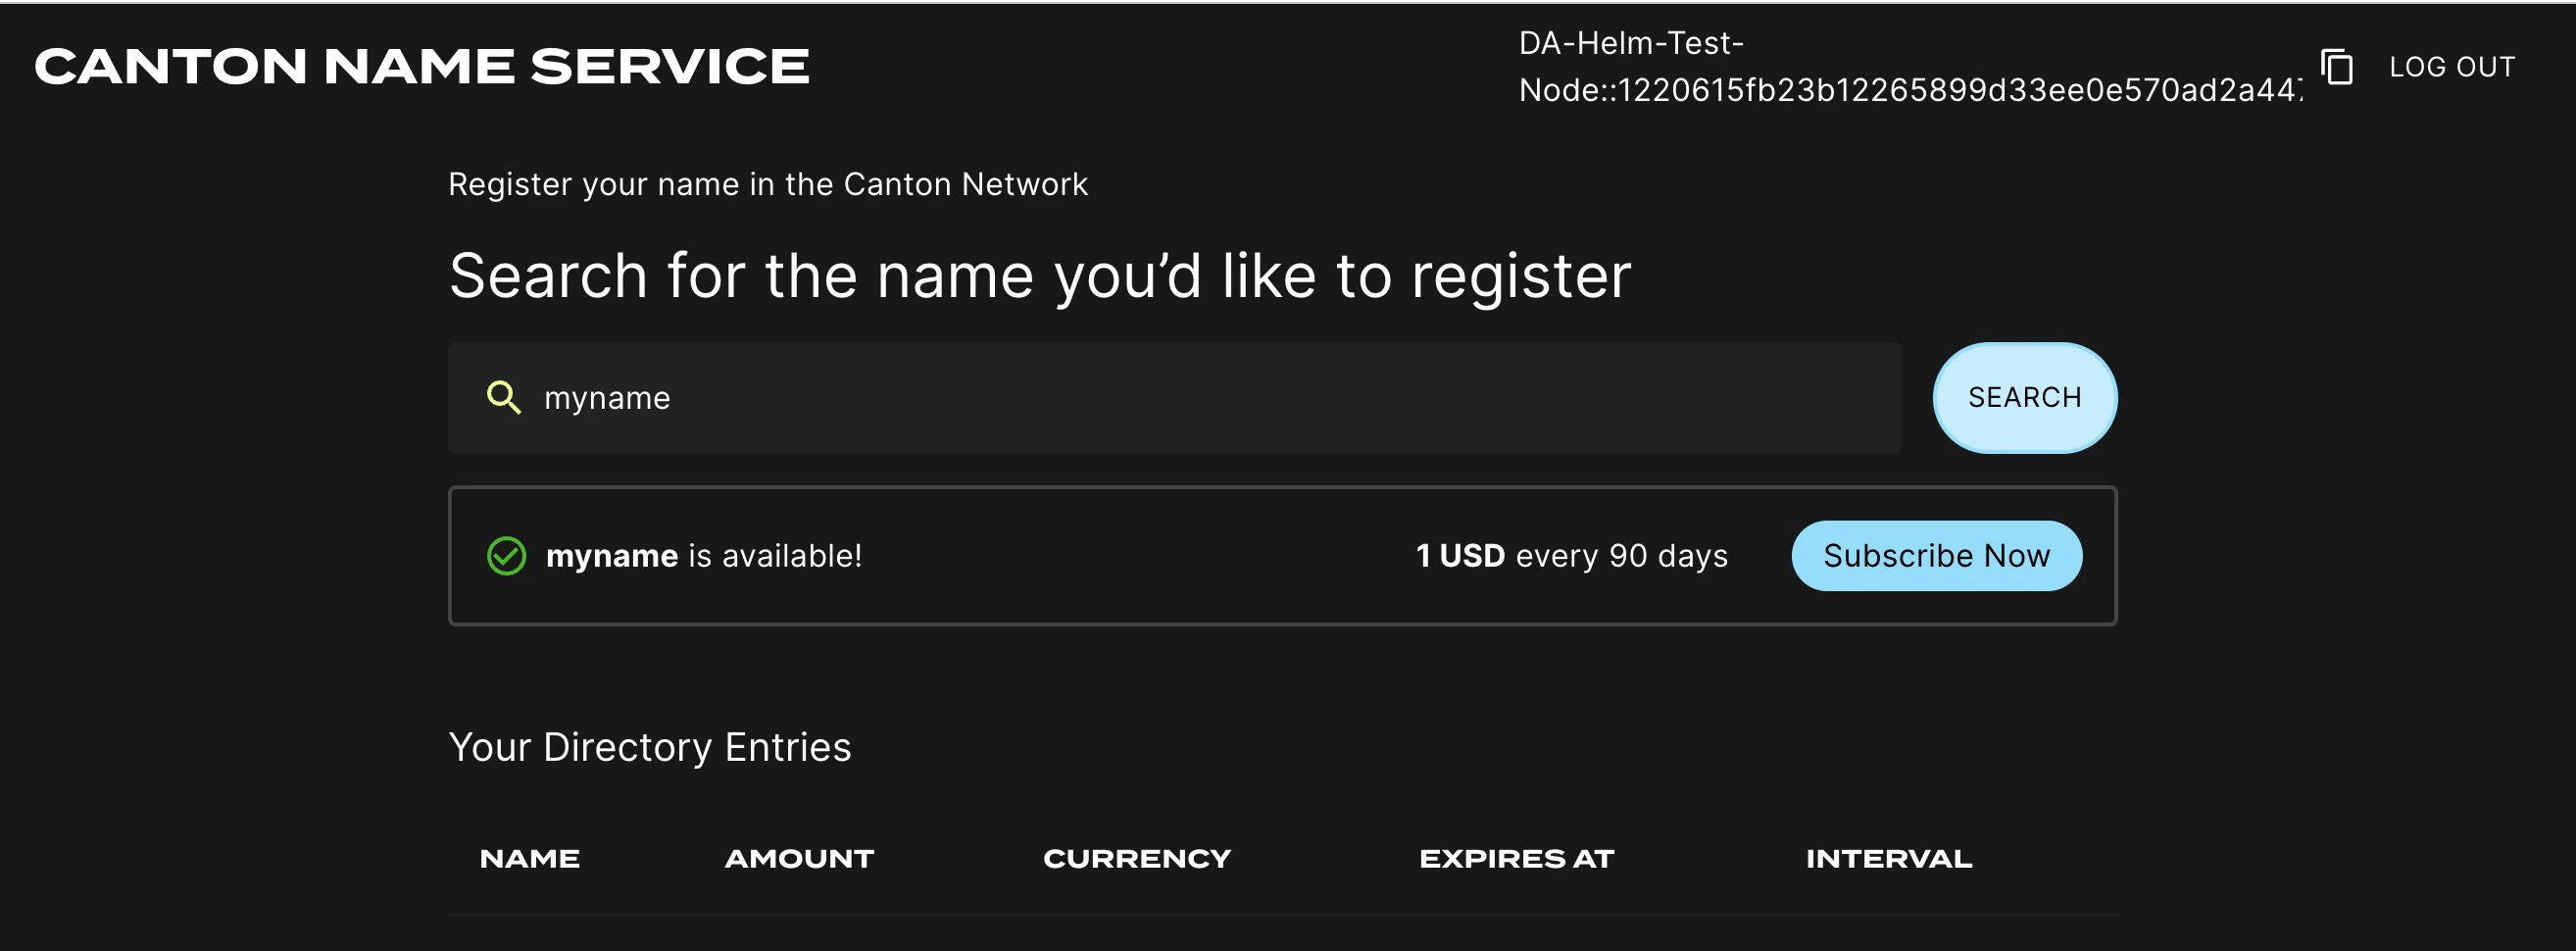
You can open your browser at https://cns.sv.YOUR_HOSTNAME and login using the credentials for the user that you configured as validatorWalletUser earlier. You will be able to register a name on the Canton Name Service.
Logging into the SV UI
Open your browser at https://sv.sv.YOUR_HOSTNAME to login to the SV Operations user interface. You can use the credentials of the validatorWalletUser to login. These are the same credentials you used for the wallet login above. Note that only Super validators will be able to login. Once logged in one should see a page with some SV collective information.
 The SV UI presents also some useful debug information for the CometBFT node. To see it, click on the “CometBFT Debug Info” tab. If your CometBFT is configured correctly, and it has connectivity to all other nodes, you should see
 n_peers that is equal to the size of the DSO, excluding your own node, and you should see all peer SVs listed as peers (their human-friendly names will be listed in the moniker fields).
The SV UI also presents the status of your global synchronizer node. To see it, click on the “Domain Node Status” tab.
Following an Amulet Conversion Rate Feed
Each SV can chose the amulet conversion rate they want to set in their SV UI. The conversion rate for each mining round is then chosen as the median of the conversion rate published by all SVs.
Instead of manually updating the conversion rate through the SV UI, it is also possible to configure the SV app to follow the conversion rate feed provided by a given publisher.
To do so, add the following to the environment variables of your SV app:
This will automatically pick up the conversion rate from #splice-amulet-name-service:Splice.Ans.AmuletConversionRateFeed:AmuletConversionRateFeed contracts published by the party publisher::namespace and set the SV’s config to the latest rate from the publisher. If the published rate falls outside of the accepted range, a warning is logged and the published rate is clamped to the configured range.
Note that SVs must wait voteCooldownTime (a governance parameter that defaults to 1min) between updates to their rate. Therefore updates made by the publisher will not propagate immediately.
  - name: ADDITIONAL_CONFIG_FOLLOW_AMULET_CONVERSION_RATE_FEED
    value: |
      canton.sv-apps.sv.follow-amulet-conversion-rate-feed {
        publisher = "publisher::namespace"
        accepted-range = {
          min = 0.01
          max = 100.0
        }
      }