This section describes how to deploy a standalone validator node in Kubernetes using Helm charts. The Helm charts deploy a validator node along with associated wallet and CNS UIs, and connect it to a global synchronizer.Documentation Index
Fetch the complete documentation index at: https://cantonfoundation-issue-409-bottom-header-height.mintlify.app/llms.txt
Use this file to discover all available pages before exploring further.
Requirements
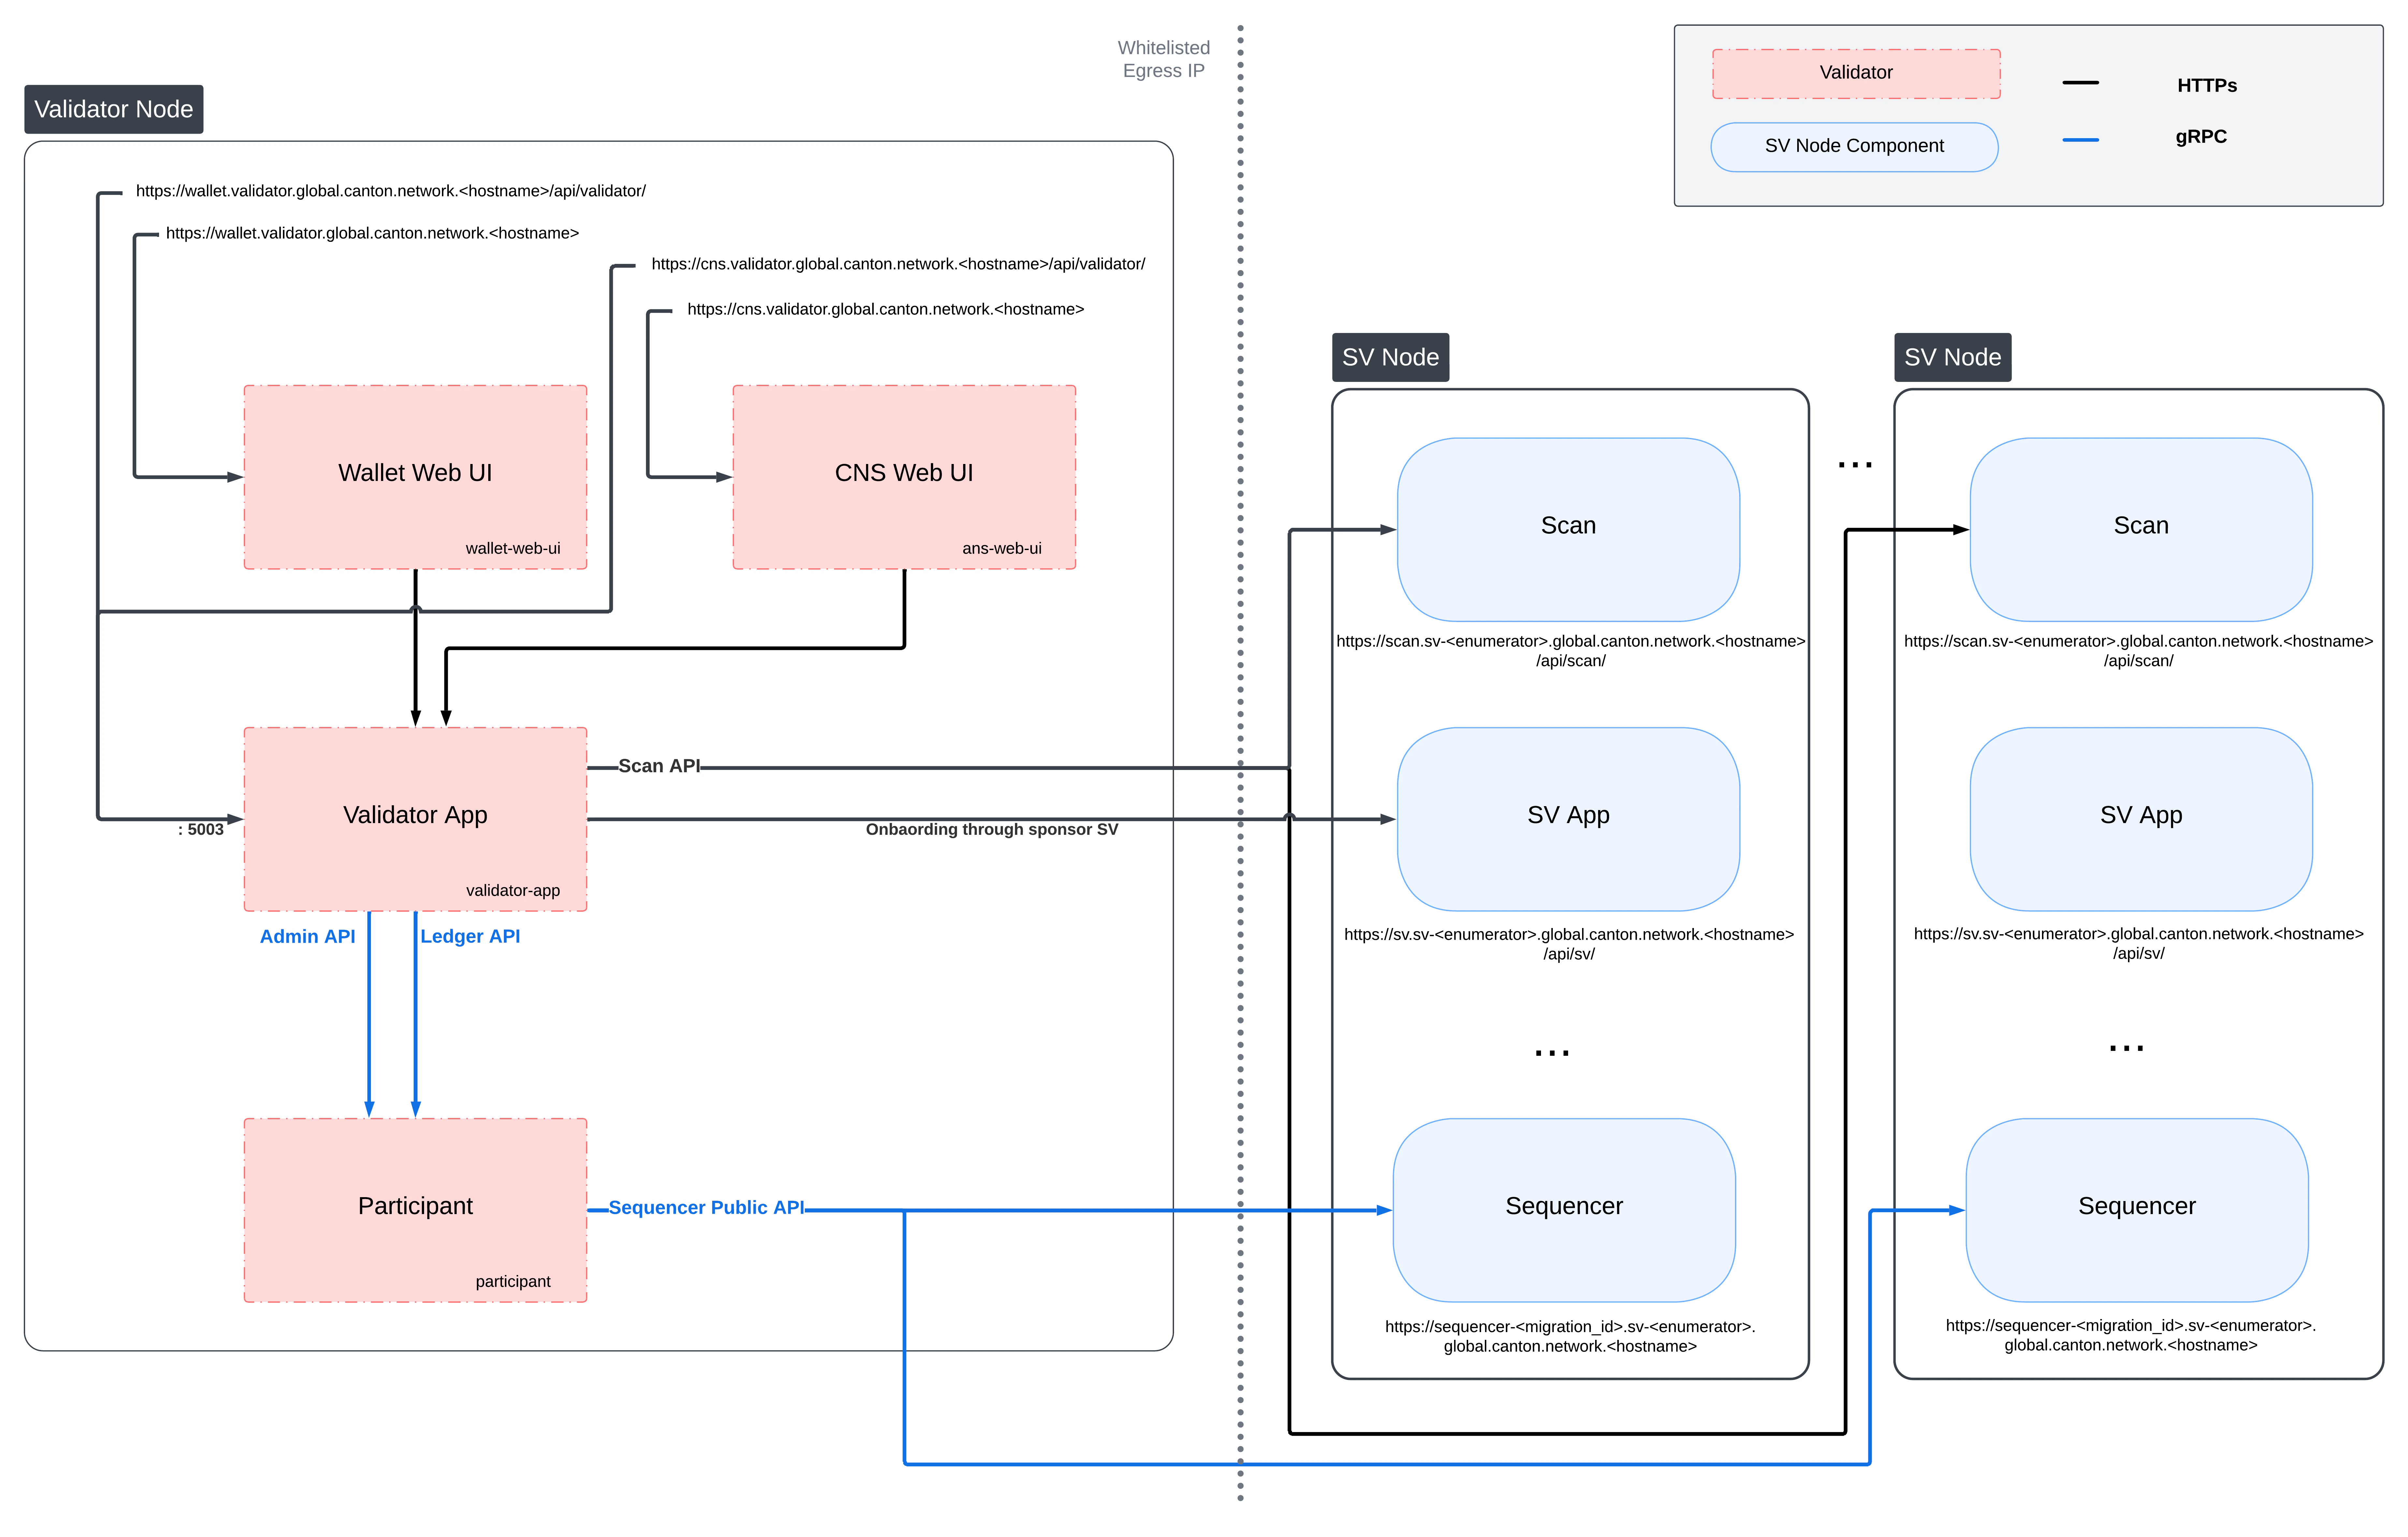
Validator Network Diagram
Preparing a Cluster for Installation
Create the application namespace within Kubernetes.The validator deployment assumes one validator per namespace. If you wish to run multiple validators in the same cluster, please create a separate namespace for each.
HTTP Proxy configuration
If you need to use an HTTP forward proxy for egress in your environment, you need to sethttps.proxyHost and https.proxyPort in additionalJvmOptions in the validator and participant helm charts to use the HTTP proxy for outgoing connections:
your.proxy.host and your_proxy_port with the actual host and port of your HTTP proxy. Proxy authentication is currently not supported.
Bypassing the proxy for specific hosts
Setting
http.nonProxyHosts affects:- The HTTP client used by the CN apps (Validator, Scan, SV, Wallet).
- JDK-level HTTP clients in the same JVM (via the default
ProxySelector). This includes the Auth0 JWK library used by the CN apps and by the Canton participant for JWKS / OIDC discovery, as well as file downloads that usejava.net.HttpURLConnection. - gRPC egress from other components, because gRPC’s Netty transport delegates proxy decisions to the default JDK
ProxySelector.
http.nonProxyHosts to bypass the proxy for specific target hosts. Matching hosts will be contacted directly rather than through the configured proxy. This is useful for services that are reachable on the local network, such as an in-cluster Scan instance or internal monitoring endpoints.
The value is a |-separated list of patterns that follows the standard Java nonProxyHosts grammar:
- Patterns match the request host name case-insensitively.
*is a wildcard. Conventionally it is used at the start (*.internal) or end (10.*) of a pattern.- Matching is performed on the raw host string from the request URI. No DNS resolution is performed, so
localhostand127.0.0.1are treated as different names unless you list both. - An empty value (e.g.
-Dhttp.nonProxyHosts=) means “no bypass patterns”.
additionalJvmOptions for the validator helm chart that proxies external traffic but bypasses the proxy for localhost / 127.0.0.1, any host in the .internal domain, and any IPv4 address whose literal string representation starts with 10.:
Configuring PostgreSQL authentication
The PostgreSQL instance that the helm charts create, and all apps that depend on it, require the user’s password to be set through Kubernetes secrets. Currently, all apps use the Postgres usercnadmin. The password can be setup with the following command, assuming you set the environment variable POSTGRES_PASSWORD to a secure value:
call out the option of using a managed postgres instance
Preparing for Validator Onboarding
Ensure that your validator onboarding secretONBOARDING_SECRET is set in the namespace you created earlier.
Configuring Authentication
For security, the various components that comprise your Validator node need to be able to authenticate themselves to each other, as well as be able to authenticate external UI and API users. We use JWT access tokens for authentication and expect these tokens to be issued by an (external) OpenID Connect (OIDC) provider. You must:- Set up an OIDC provider in such a way that both backends and web UI users are able to obtain JWTs in a supported form.
- Configure your backends to use that OIDC provider.
helm-validator-no-auth.
OIDC Provider Requirements
This section provides pointers for setting up an OIDC provider for use with your Validator node. Feel free to skip directly tohelm-validator-auth0 if you plan to use Auth0 for your Validator node’s authentication needs.
These docs focus on Auth0, and are being continuously tested and maintained. Other OIDC providers can be used, and are in active use by various community members, who have contributed some notes and examples in Okta and Keycloak community authored examples.
Your OIDC provider must be reachable1 at a well known (HTTPS) URL. In the following, we will refer to this URL as OIDC_AUTHORITY_URL. Both your Validator node and any users that wish to authenticate to a web UI connected to your Validator node must be able to reach the OIDC_AUTHORITY_URL. We require your OIDC provider to provide a discovery document at OIDC_AUTHORITY_URL/.well-known/openid-configuration. We furthermore require that your OIDC provider exposes a JWK Set document. In this documentation, we assume that this document is available at OIDC_AUTHORITY_URL/.well-known/jwks.json.
For machine-to-machine (Validator node component to Validator node component) authentication, your OIDC provider must support the OAuth 2.0 Client Credentials Grant flow. This means that you must be able to configure (CLIENT_ID, CLIENT_SECRET) pairs for all Validator node components that need to authenticate themselves to other components. Currently, this is the validator app backend - which needs to authenticate to the Validator node’s Canton participant. The sub field of JWTs issued through this flow must match the user ID configured as ledger-api-user in helm-validator-auth-secrets-config. In this documentation, we assume that the sub field of these JWTs is formed as CLIENT_ID@clients. If this is not true for your OIDC provider, pay extra attention when configuring ledger-api-user values below.
For user-facing authentication - allowing users to access the various web UIs hosted on your Validator node, your OIDC provider must support the OAuth 2.0 Authorization Code Grant flow and allow you to obtain client identifiers for the web UIs your Validator node will be hosting. Currently, these are the Wallet web UI and the CNS web UI. You might be required to whitelist a range of URLs on your OIDC provider, such as “Allowed Callback URLs”, “Allowed Logout URLs”, “Allowed Web Origins”, and “Allowed Origins (CORS)”. If you are using the ingress configuration of this runbook, the correct URLs to configure here are https://wallet.validator.YOUR_HOSTNAME (for the Wallet web UI) and https://cns.validator.YOUR_HOSTNAME (for the CNS web UI).
YOUR_HOSTNAME is a placeholder that you need to replace with the actual domain name or IP address of the server hosting your services.
An identifier that is unique to the user must be set via the sub field of the issued JWT. On some occasions, this identifier will be used as a user name for that user on your Validator node’s Canton participant. In helm-validator-install, you will be required to configure a user identifier as the validatorWalletUser -make sure that whatever you configure there matches the contents of the sub field of JWTs issued for that user.
All JWTs issued for use with your Validator node:
- must be signed using the RS256 signing algorithm
scope explicitly set to daml_ledger_api (when requested to do so as part of the OAuth 2.0 authorization code flow).
Summing up, your OIDC provider setup must provide you with the following configuration values:
| Name | Value |
|---|---|
| OIDC_AUTHORITY_URL | The URL of your OIDC provider for obtaining the openid-configuration and jwks.json. |
| VALIDATOR_CLIENT_ID | The client id of your OIDC provider for the validator app backend. |
| VALIDATOR_CLIENT_SECRET | The client secret of your OIDC provider for the validator app backend. |
| WALLET_UI_CLIENT_ID | The client id of your OIDC provider for the wallet UI. |
| CNS_UI_CLIENT_ID | The client id of your OIDC provider for the CNS UI. |
Name column, in helm-validator-auth-secrets-config and helm-validator-install.
When first starting out, it is suggested to configure both JWT token audiences below to the same value: https://canton.network.global.
Once you can confirm that your setup is working correctly using this (simple) default, we recommend that you configure dedicated audience values that match your deployment and URLs. This is important for security to avoid tokens for your validators on one network be usable for your validators on another network. You can configure audiences of your choice for the participant ledger API and the validator backend API. We will refer to these using the following configuration values:
| Name | Value |
|---|---|
| OIDC_AUTHORITY_LEDGER_API_AUDIENCE | The audience for the participant ledger API. e.g. https://ledger_api.example.com |
| OIDC_AUTHORITY_VALIDATOR_AUDIENCE | The audience for the validator backend API. e.g. https://validator.example.com/api |
| Name | Value |
|---|---|
| OIDC_AUTHORITY_LEDGER_API_SCOPE | The scope for the participant ledger API. Optional |
helm-validator-auth0 as well, to check for functionality or configuration details that your OIDC provider setup might be missing.
Configuring an Auth0 Tenant
To configure Auth0 as your validator’s OIDC provider, perform the following:- Create an Auth0 tenant for your validator
-
Create an Auth0 API that controls access to the ledger API:
- Navigate to Applications > APIs and click “Create API”. Set name to
Daml Ledger API, set identifier tohttps://canton.network.global. Alternatively, if you would like to configure your own audience, you can set the identifier here. e.g.https://ledger_api.example.com. - Under the Permissions tab in the new API, add a permission with scope
daml_ledger_api, and a description of your choice. - On the Settings tab, scroll down to “Access Settings” and enable “Allow Offline Access”, for automatic token refreshing.
- Navigate to Applications > APIs and click “Create API”. Set name to
-
(Optional) If you want to configure a different audience to your APIs, you can do so by creating new Auth0 APIs with an identifier set to the audience of your choice. For example,
- Create another API by setting name to
Validator App API, set identifier for the Validator backend app e.g.https://validator.example.com/api.
- Create another API by setting name to
-
Create an Auth0 Application for the validator backend:
- In Auth0, navigate to Applications -> Applications, and click the “Create Application” button.
- Name it
Validator app backend, choose “Machine to Machine Applications”, and click Create. - Choose the
Daml Ledger APIAPI you created in step 2 in the “Authorize Machine to Machine Application” dialog and click Authorize.
-
Create an Auth0 Application for the wallet web UI.
- In Auth0, navigate to Applications -> Applications, and click the “Create Application” button.
- Choose “Single Page Web Applications”, call it
Wallet web UI, and click Create. - Determine the URL for your validator’s wallet UI. If you’re using the ingress configuration of this runbook, that would be
https://wallet.validator.YOUR_HOSTNAME. - In the Auth0 application settings, add the URL of the validator wallet to the following:
- “Allowed Callback URLs”
- “Allowed Logout URLs”
- “Allowed Web Origins”
- “Allowed Origins (CORS)”
- Save your application settings.
-
Create an Auth0 Application for the CNS web UI. Repeat all steps described in step 5, with following modifications:
- In step b, use
CNS web UIas the name of your application. - In steps c and d, use the URL for your validator’s CNS UI. If you’re using the ingress configuration of this runbook, that would be
https://cns.validator.YOUR_HOSTNAME.
- In step b, use
helm-validator-install - for being able to log in as your Validator node’s administrator. You will be asked to obtain the user identifier for this user account. It can be found in the Auth0 interface under User Management -> Users -> your user’s name -> user_id (a field right under the user’s name at the top).
We will use the environment variables listed in the table below to refer to aspects of your Auth0 configuration:
| Name | Value |
|---|---|
| OIDC_AUTHORITY_URL | https://AUTH0_TENANT_NAME.us.auth0.com |
| OIDC_AUTHORITY_LEDGER_API_AUDIENCE | The optional audience of your choice for Ledger API. e.g. https://ledger_api.example.com |
| VALIDATOR_CLIENT_ID | The client id of the Auth0 app for the validator app backend |
| VALIDATOR_CLIENT_SECRET | The client secret of the Auth0 app for the validator app backend |
| WALLET_UI_CLIENT_ID | The client id of the Auth0 app for the wallet UI |
| CNS_UI_CLIENT_ID | The client id of the Auth0 app for the CNS UI |
AUTH0_TENANT_NAME is the name of your Auth0 tenant as shown at the top left of your Auth0 project. You can obtain the client ID and secret of each Auth0 app from the settings pages of that app.
Configuring Authentication on your Validator
We are now going to configure your Validator node software based on the OIDC provider configuration values you exported to environment variables at the end of eitherhelm-validator-auth-requirements or helm-validator-auth0. (Note that some authentication-related configuration steps are also included in helm-validator-install)
The validator app backend requires the following secret (omit the scope if it is not needed in your setup)
Running without Authentication
In order to run the validator without authentication, adddisableAuth: true to both splice-node/examples/sv-helm/validator-values.yaml and splice-node/examples/sv-helm/participant-values.yaml. Note that you must disable auth in both places, otherwise the validator will not be able to connect to the participant.
When running without authentication, the username of the validator administrator is administrator.
Installing the Software
Configuring the Helm Charts
Installing the Helm Charts
Configuring the Cluster Ingress
The following routes should be configured in your cluster ingress controller.| Services | Port | Routes |
|---|---|---|
wallet-web-ui | https://wallet.validator.<YOUR_HOSTNAME> | |
validator-app ans-web-ui | 5003 | https://wallet.validator.<YOUR_HOSTNAME>/api/validator https://cns.validator.<YOUR_HOSTNAME> |
validator-app | 5003 | https://cns.validator.<YOUR_HOSTNAME>/api/validator |
participant | 7575 | https://<YOUR_HOSTNAME>/api/json-api (optional, not required by the validator itself but if you want to access the ledger API yourself. You can change the route freely) |
https://wallet.validator.<YOUR_HOSTNAME>should be routed to servicewallet-web-uiin thevalidatornamespacehttps://wallet.validator.<YOUR_HOSTNAME>/api/validatorshould be routed to/api/validatorat port 5003 of servicevalidator-appin thevalidatornamespacehttps://cns.validator.<YOUR_HOSTNAME>should be routed to serviceans-web-uiin thevalidatornamespacehttps://cns.validator.<YOUR_HOSTNAME>/api/validatorshould be routed to/api/validatorat port 5003 of servicevalidator-appin thevalidatornamespace
Requirements
In order to install the reference charts, the following must be satisfied in your cluster:- cert-manager must be available in the cluster (See cert-manager documentation)
- istio should be installed in the cluster (See istio documentation)
Installation Instructions
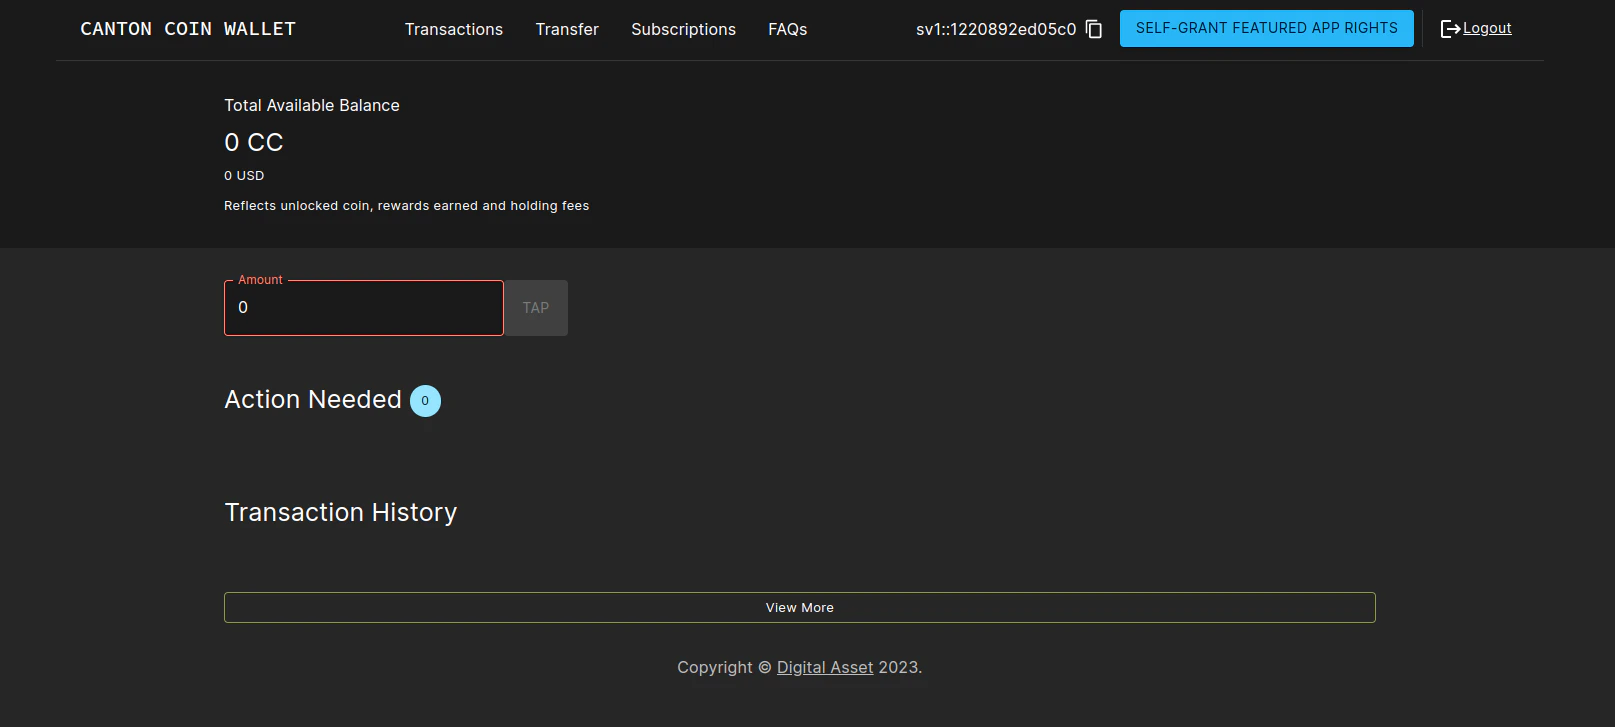
Logging into the wallet UI
After you deploy your ingress, open your browser at https://wallet.validator.YOUR_HOSTNAME and login using the credentials for the user that you configured asvalidatorWalletUser earlier. Once logged in one should see the transactions page.
explain the config sections below in a way that makes them also accessible to the Docker compose users
Configuring automatic traffic purchases
By default your node will be configured to automatically purchase traffic on a pay-as-you-go basis (see automatically purchase traffic). To disable or tune to your needs, edit the following section in the validator-values.yaml file:* show error message that people will see while the traffic purchase fails due to insufficient funds; it is currentlye here:
error-insufficient-funds * link to the option to disable automatic top-ups, and call out the option of using third-party traffic providersConfiguring sweeps and auto-accepts of transfer offers
To do so, uncomment and fill in the following section in thevalidator-values.yaml file:
validator-values.yaml file:
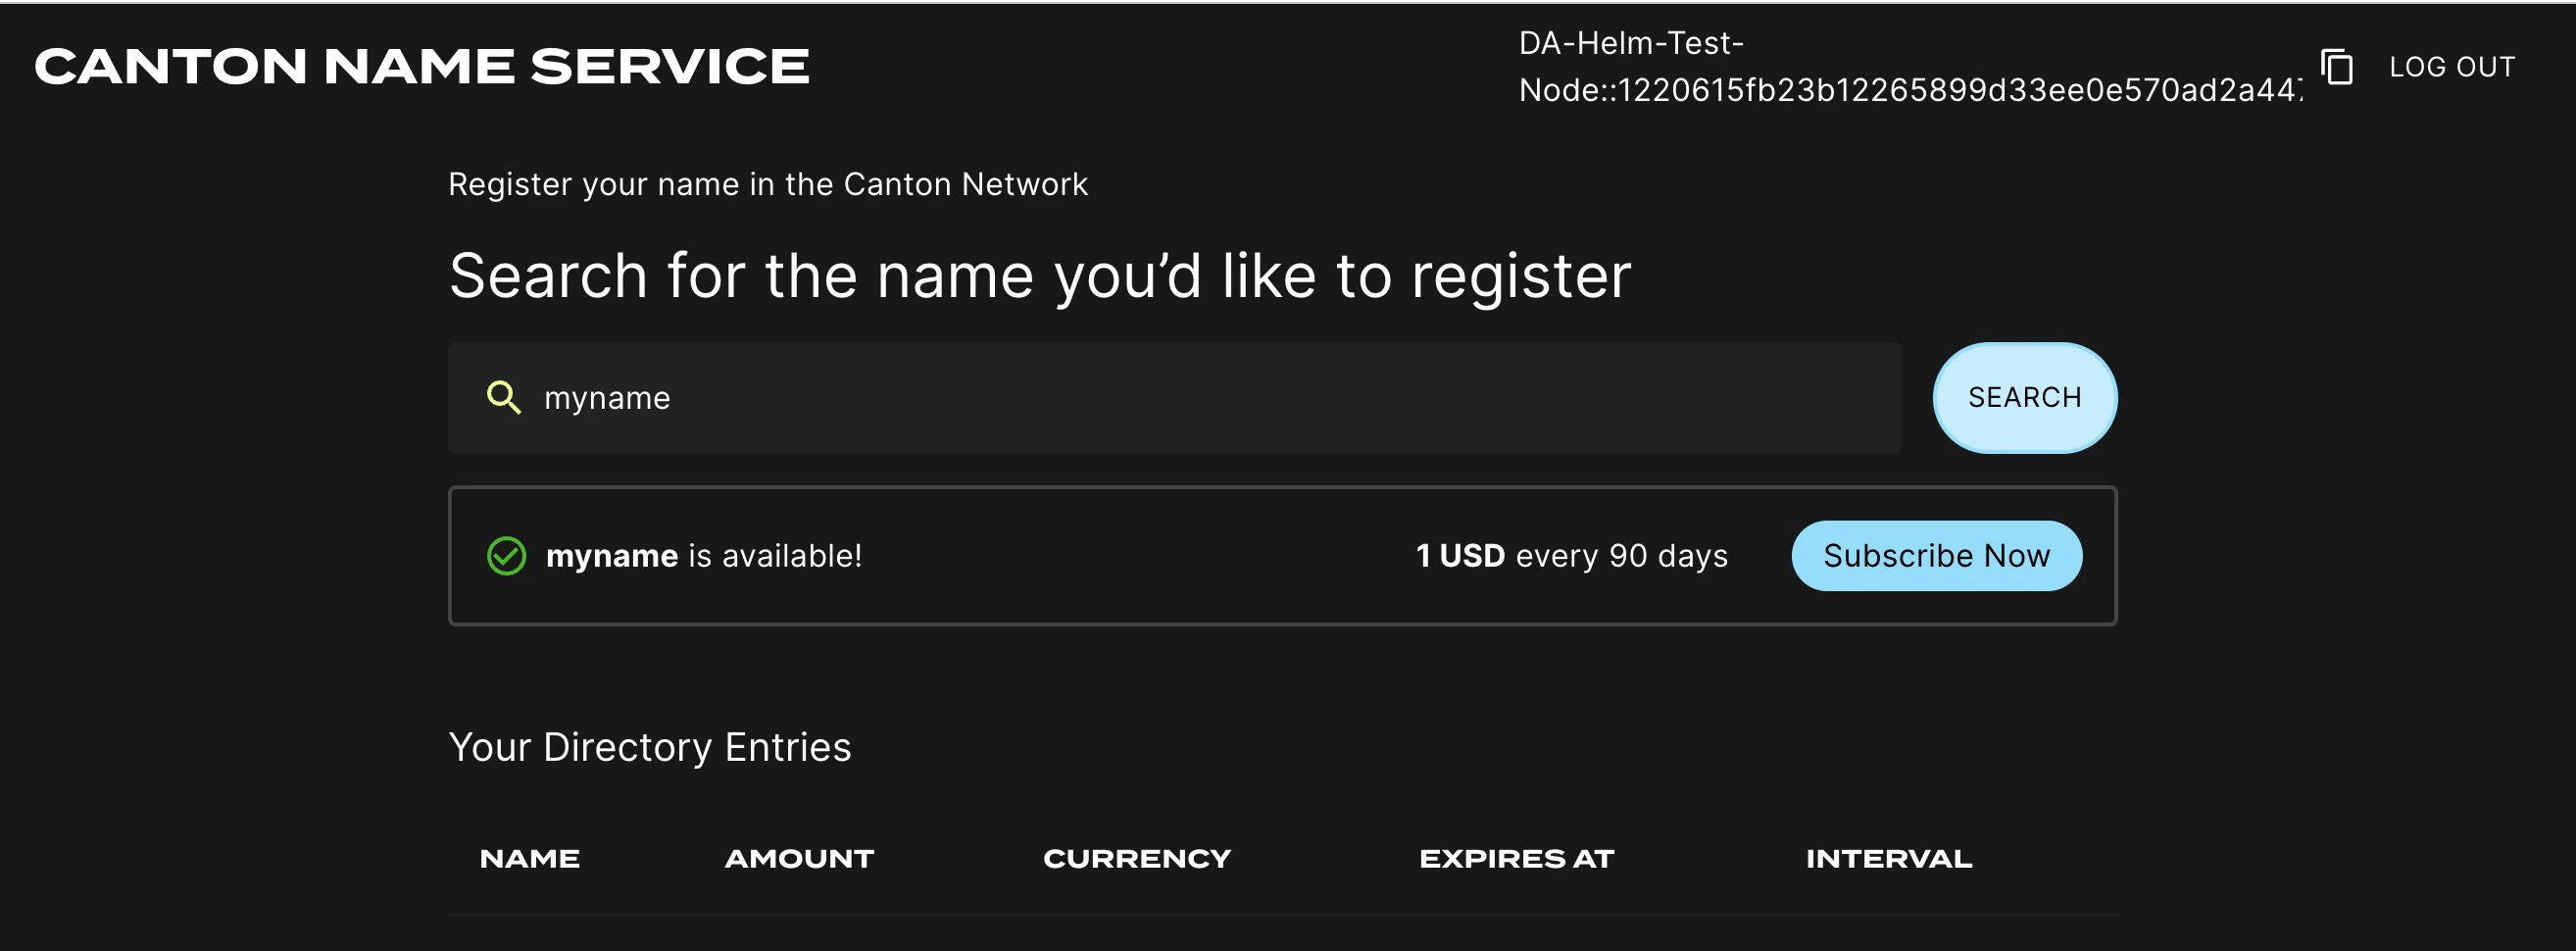
Logging into the CNS UI
You can open your browser at https://cns.validator.YOUR_HOSTNAME and login using the credentials for the user that you configured asvalidatorWalletUser earlier. You will be able to register a name on the Canton Name Service.
Participant Pruning
By default, participants preserve all history. However, this leads to gradually growing databases and can slow down certain queries, in particular, queries for the active contract set on the ledger API. To mitigate that, it is possible to enable participant pruning which will remove all history beyond a specified retention point and only preserve the active contract set. Note that this only affects the participant stores. The CN apps (Validator, SV and Scan) are unaffected by enabling this, so e.g., the history in your wallet will never be pruned. Below you can see an example of the pruning config that you need to add tovalidator-values.yaml to retain only the history for the last 48h.
Note that if your node is down for longer than the pruning window (48 hours in the example above), your node will most probably get corrupted, as the apps race catching up with the participant’s attempts to keep pruning. It is therefore advisable to set the pruning window to a value that you are comfortable with in terms of guaranteeing uptime of your node. Setting it to 30 days is in general a reasonable choice, as the sequencers currently are also pruned after 30 days, so you will not be able to catch up with the network after a longer downtime anyway (see Disaster Recovery for disaster recovery guidelines).
Refer to the pruning guide for more details on participant pruning.
Configuring init containers
If you need to configure init containers on the participant or validator deployments, you can use the following helm values forsplice-participant or splice-validator:
Working around volume ownership issues
The containers in thesplice-validator chart run as non-root users (specifically, user:group 1001:1001) for security reasons. The pod mounts volumes for use by the containers, and these volumes need to be owned by the user that the containers run as. The Helm chart uses an fsGroup security context to ensure that the mounted volumes are owned by the correct user. In certain environments, however, this does not work as expected and the mounted volumes are owned by root. If you encounter this issue, you can work around it by creating init containers that change the ownership of the mounted volumes to the correct user.
For example, for the /domain-upgrade-dump volume (required for synchronizer upgrades), you can add the following to your validator-values.yaml file:
/participant-bootstrapping-dump (required when recovering from identities backup).
Footnotes
- The URL must be reachable from the Canton participant and validator app running in your cluster, as well as from all web browsers that should be able to interact with the wallet and CNS UIs. ↩